

Design System Chronicles (Tenet UI)
Post #6 - Typography system | Post #7 - Typography variables | Post #8 - Breaking Down Component Research

Ever had to manually update every single text style in your design system because of one font change? Painful, right?
This is exactly why typography variables exist.
But just before we begin, understand that unlike color variables, where you don’t need styles set up, typography in Figma requires styles first, before applying variables on top of them.

This means you need a structured approach to defining font families, sizes, weights, line heights before setting up variables.
I’ll walk you through how I set up typography variables in Tenet UI—why they matter, how they make managing text styles easier, and how you can implement them in your own design system.
If you haven’t read my previous post - “Establishing a typography system”, I recommend you read that. Establishing a system is necessary before you could set up typography variables.
Firstly, imagine having to change the font family (for some reason) after you have set up the styles. You would have to go through every style created to change it. With variables, its a change in one place that reflects in all your styles.

Secondly, what if you have multiple brands, requiring different font families, having different types of font sizes, weights and line heights? With variables, you could set up “modes” (just like your colour - light and dark themes) and have different type styles work to your advantage with just one click.


📖 Read next:
- Post #6 (Design System Chronicles) - Establishing a typography system
- Post #8 (Design System Chronicles) - Breaking Down Component Research
Understanding what we may need
Remember when we set up a type style, we create one having
Name
Font family
Font size
Font weight
Line height
Letter spacing (I didn’t set this up for Tenet UI)
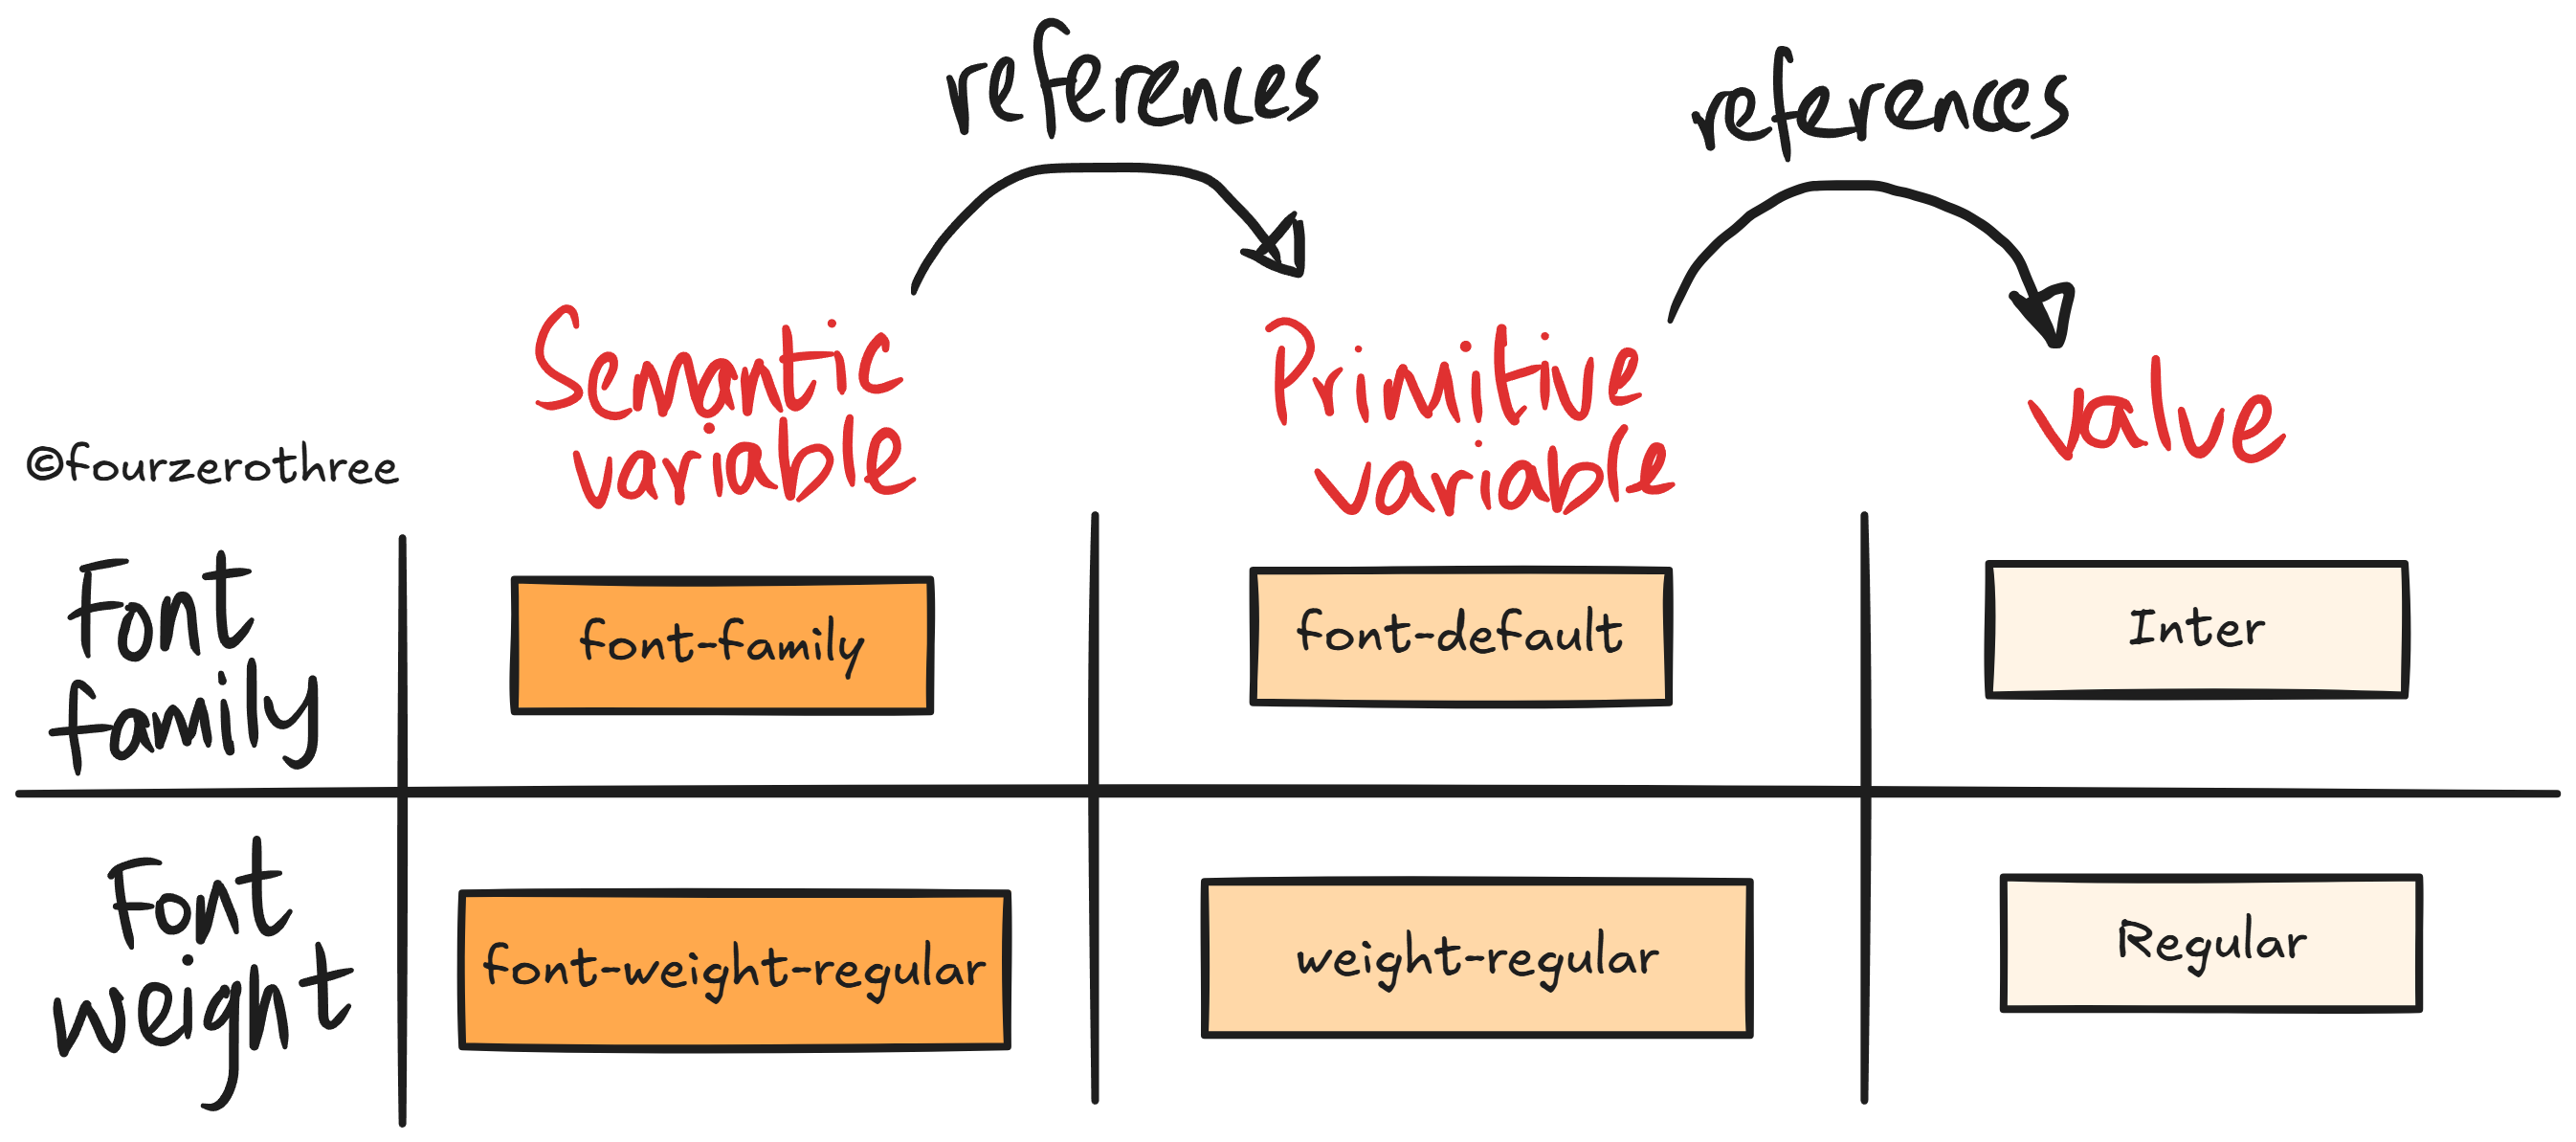
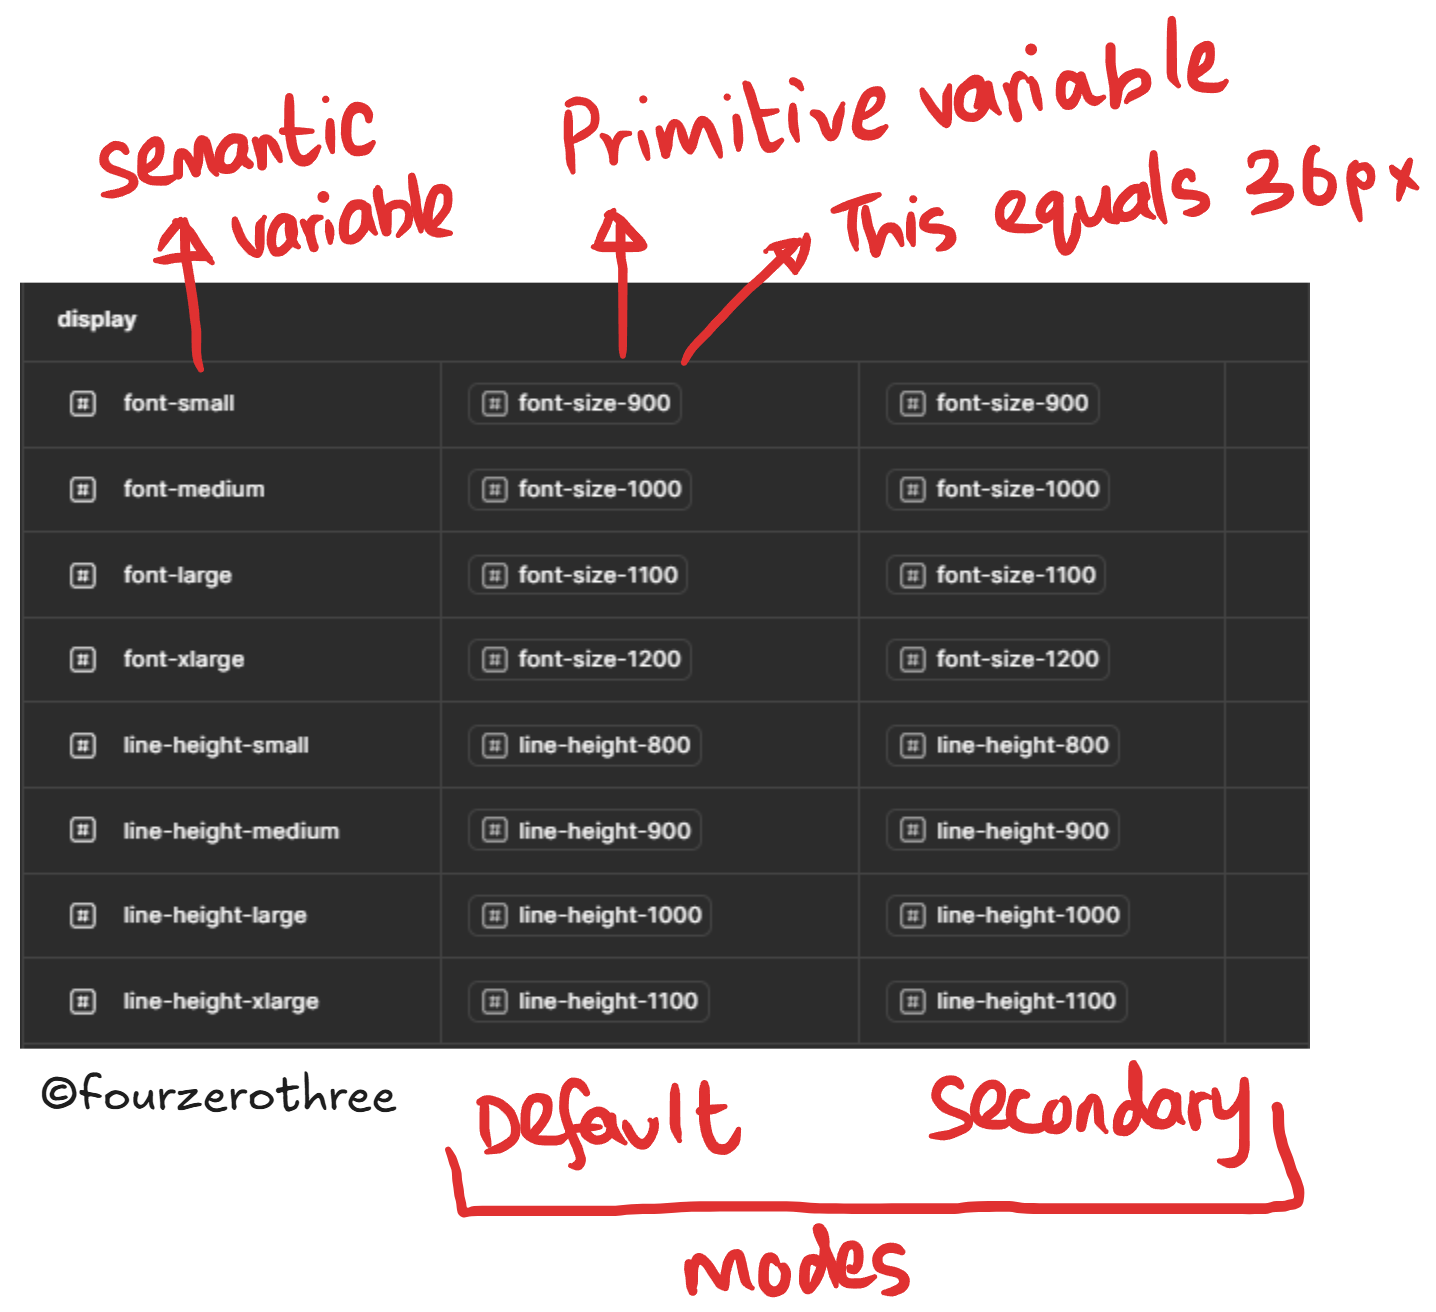
For typography, every property of the type style would require a variable. Similar to colours, we set up both primitives and semantics for typography variables.
The semantic variables references the primitive variables which in turn references a value we define.
Quirks with typography
When setting up variables, there is one quirk with relation to “Font weight” that I want to discuss before moving on.
Lets have a look at the value “type” for each property.
The value type for every property (and in turn variable) is pretty much straightforward, except for Font weight. Here are some quirks you need to keep in mind.
Font weight in our example could have a value of “Regular” (type - string) or “400” (type - number).
However, you cannot have a number value type for defining let’s say “SemiBold Italic”. You need to feed a string.
When defining a string type, the same name may differ across fonts. For example, Inter has a font weight called “Semi Bold” while Roboto defines the same weight as “SemiBold”. This means if you define a primitive as “SemiBold” you need to check if this may work across other font families. If not, you may need to define another primitive with the value “Semi Bold” and reference this primitive variable to the respective font family (semantic variable) it works for.

Creating typography variables
Primitive variables
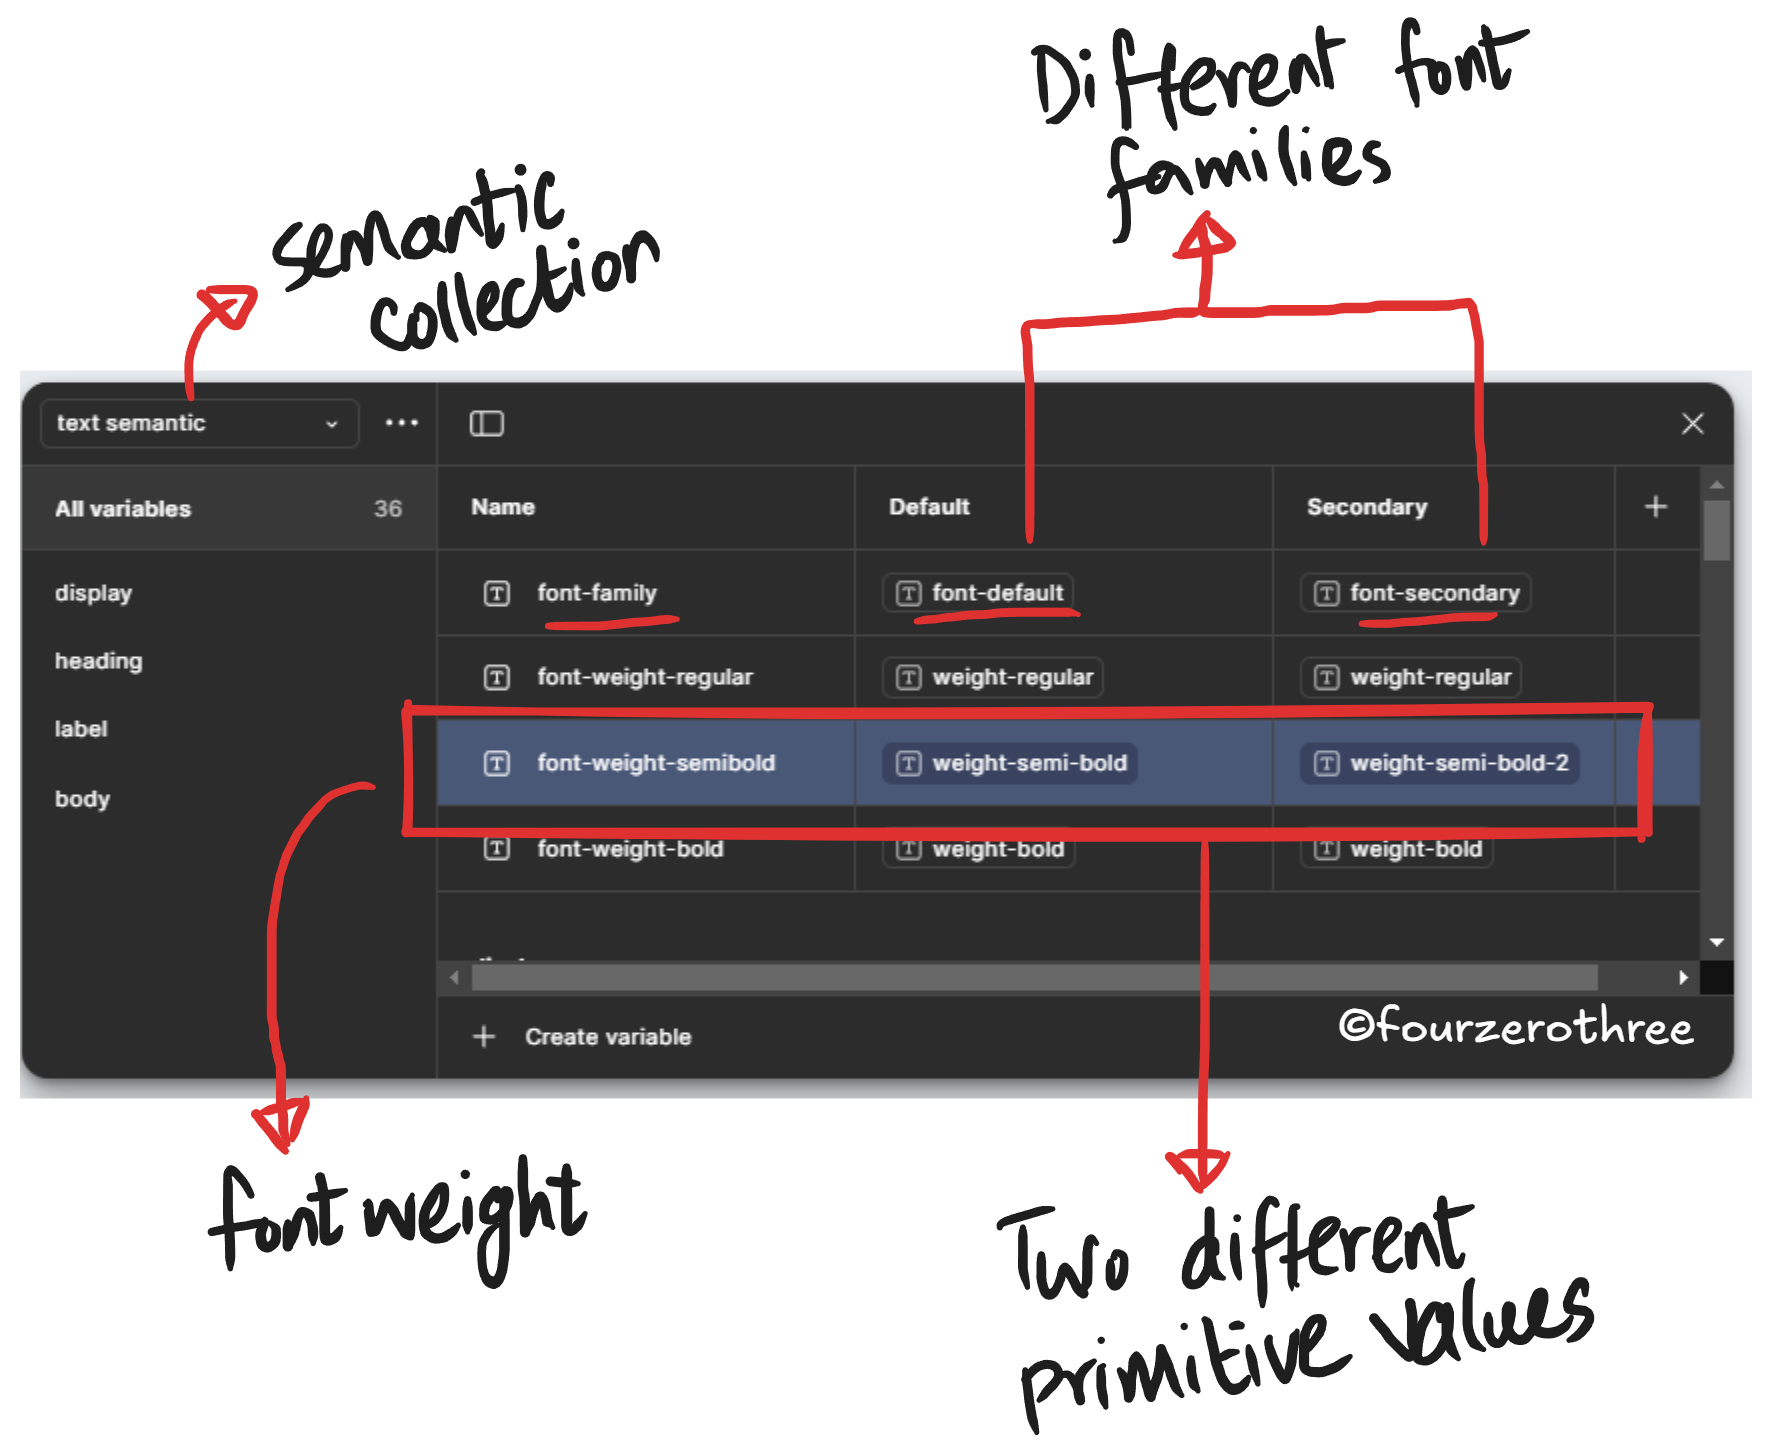
When going through the styles that I had set up for typography, I looked for the 4 properties that define the system - a) Font family, b) Font weight, c) Font size, d) Line height (check out Tenet UI to have look at the variables set up).
I wanted 2 font families. The corresponding primitives were
“font-default” - Inter
“font-secondary” - Roboto

I had 3 different font weights. Primitives were
“weight-regular” - Regular
“weight-semi-bold” - Semi Bold
“weight-bold” - Bold
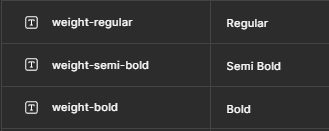
Note - The value “Semi Bold” surprisingly worked for Roboto as well, though Roboto defines it as “SemiBold”.
I had quite the range of font sizes and corresponding line heights. Like colours, I named the font sizes and line heights in hops of 100,
ranging from “font-size-100” (smallest being 12) to font-size-1200” (largest being 72) for font size and

ranging from “line-height-100” (smallest being 16) to line-height-1100” (largest being 84) for line height.

Semantic variables
Firstly I created 2 different “modes” called “Default” and “Secondary”. Default would hold the font family “Inter” and Secondary would hold “Roboto”.
Second, I created semantic variables for font family and font weight and referenced the corresponding primitives.

Note, that I have 4 different “roles” for my typography scale (you could read about this in Post #6 - Establishing a typography system), which goes like
display
heading
label
body
Every role has its own hierarchical font sizes and corresponding line heights.
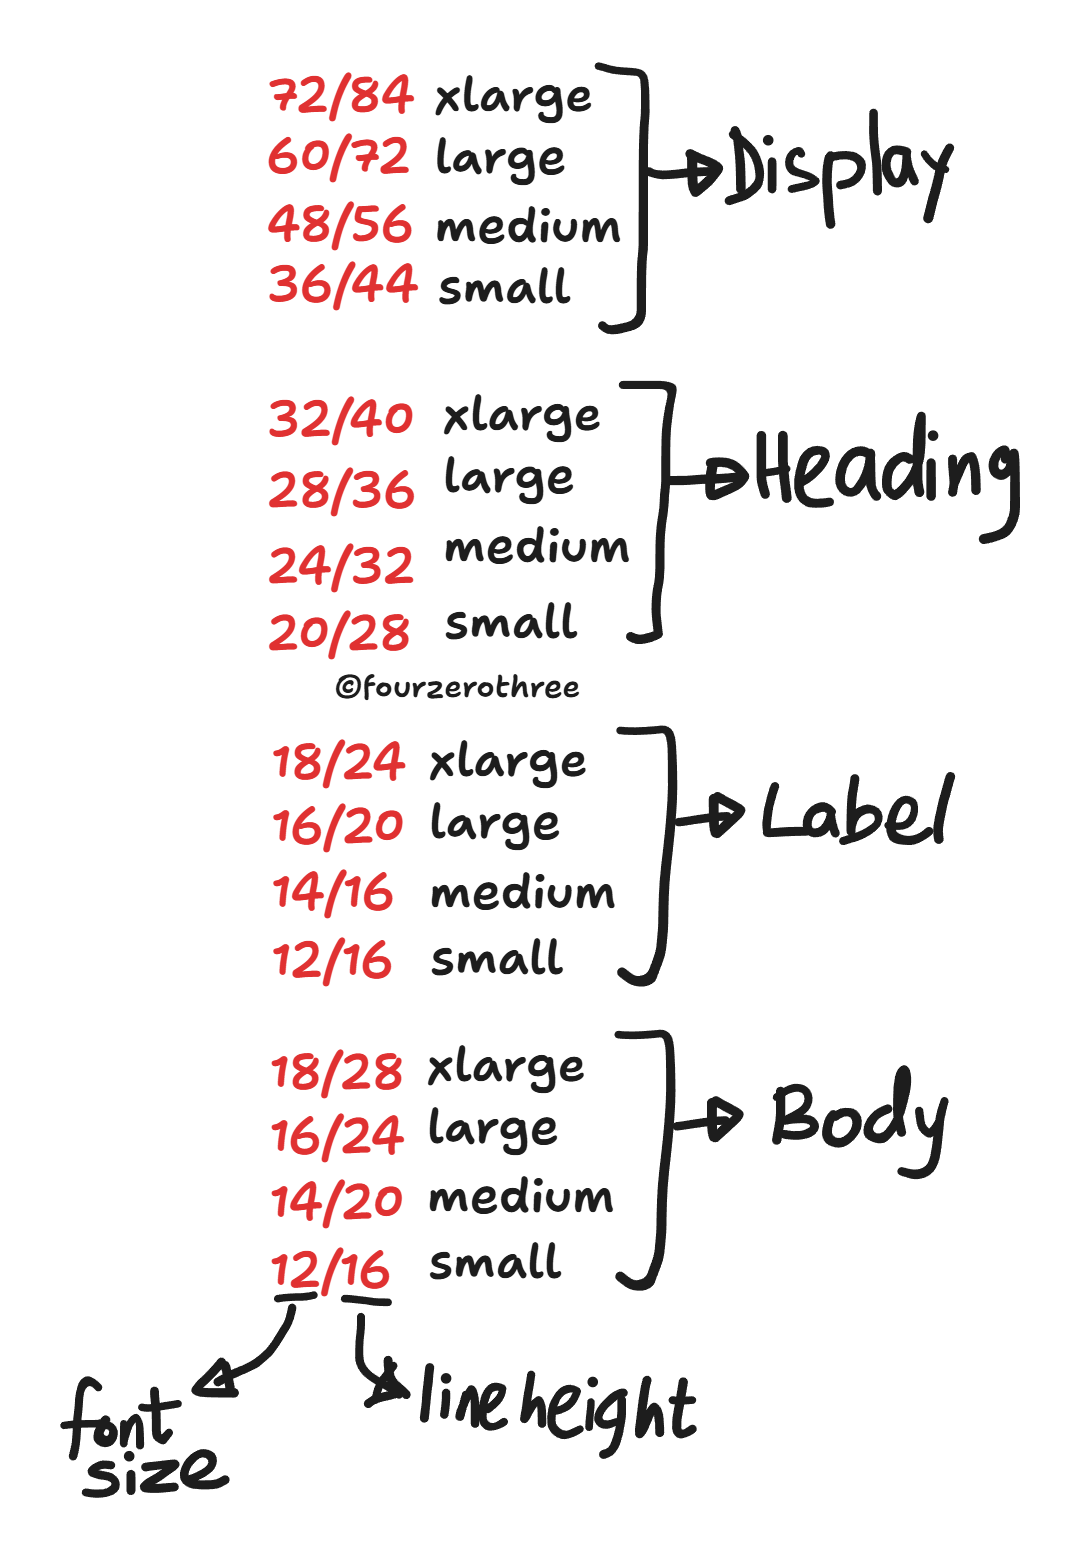
All semantic variables for the font size and line height for every hierarchical role - display, heading, label and body is created in the semantic variable collection.


For example, note that “font-small” (semantic variable) references “font-size-900” that holds the value “36px”
💡Mind you the mapping of the semantic and primitives can get a little tedious and one has to be careful.
Applying typography variables
Scoping variables
Before applying the variables to my styles, I did one last step to ensure my workflow got a tad easier.
I scoped the semantic variables for their respective property. For example if I chose to assign the font size to a particular style, I ensured
a) my primitive values don’t show up

b) only font size semantic variables show up
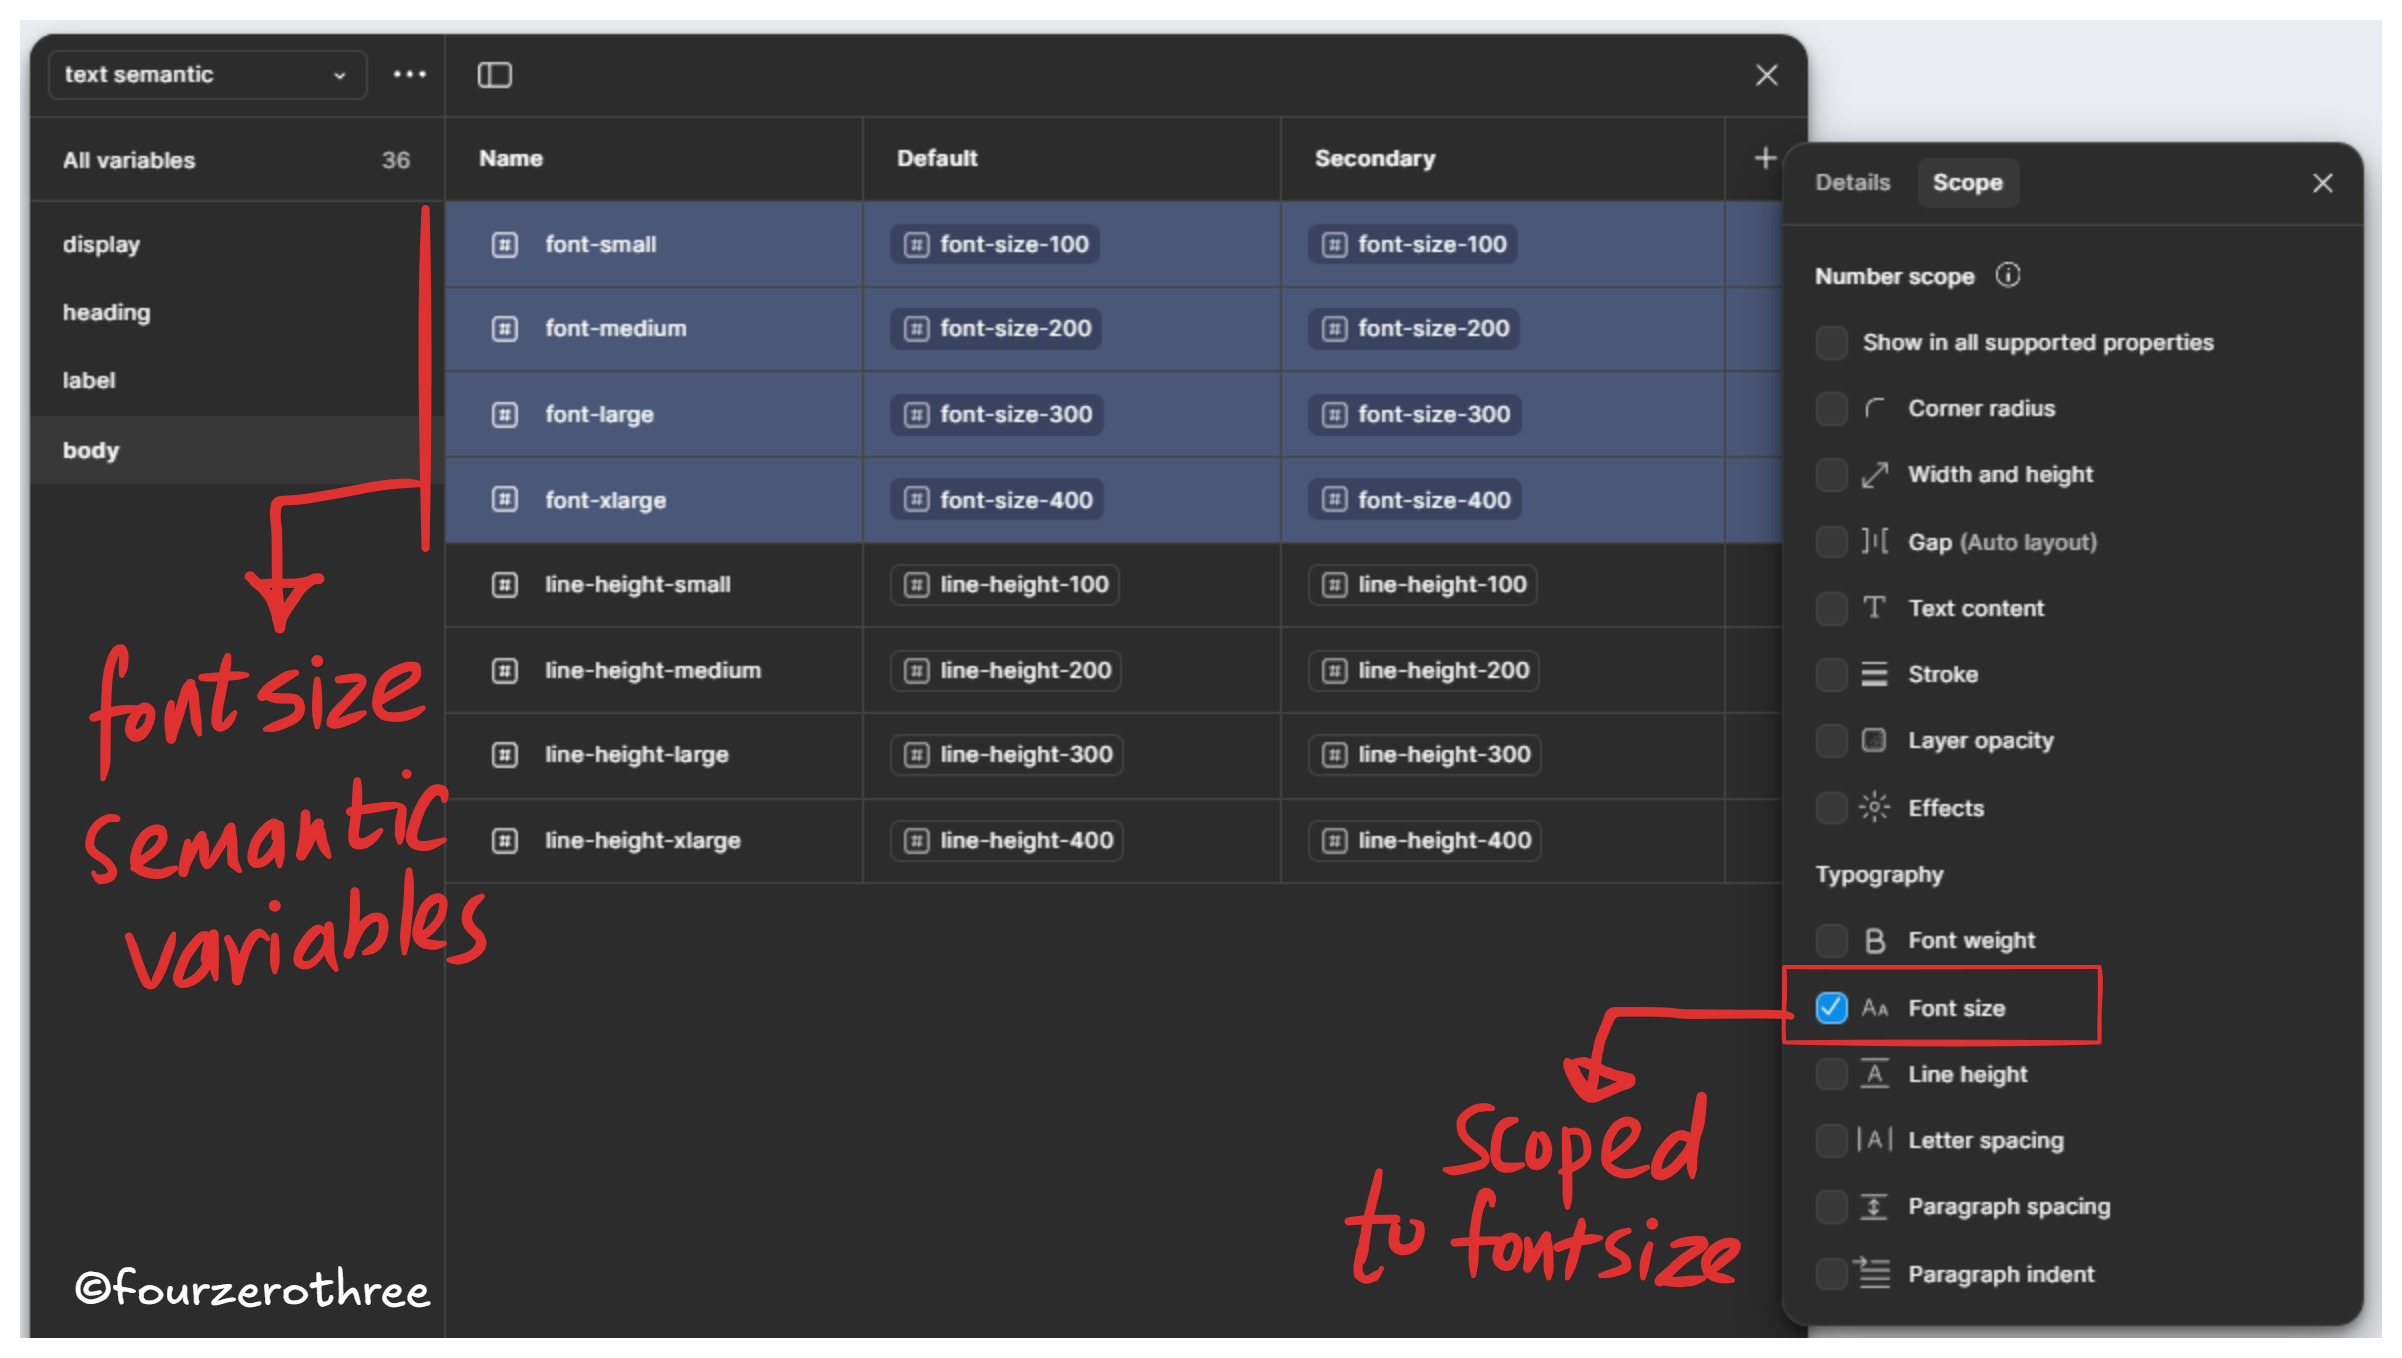
Now, I have less effort applying them to my styles (in the font size category).
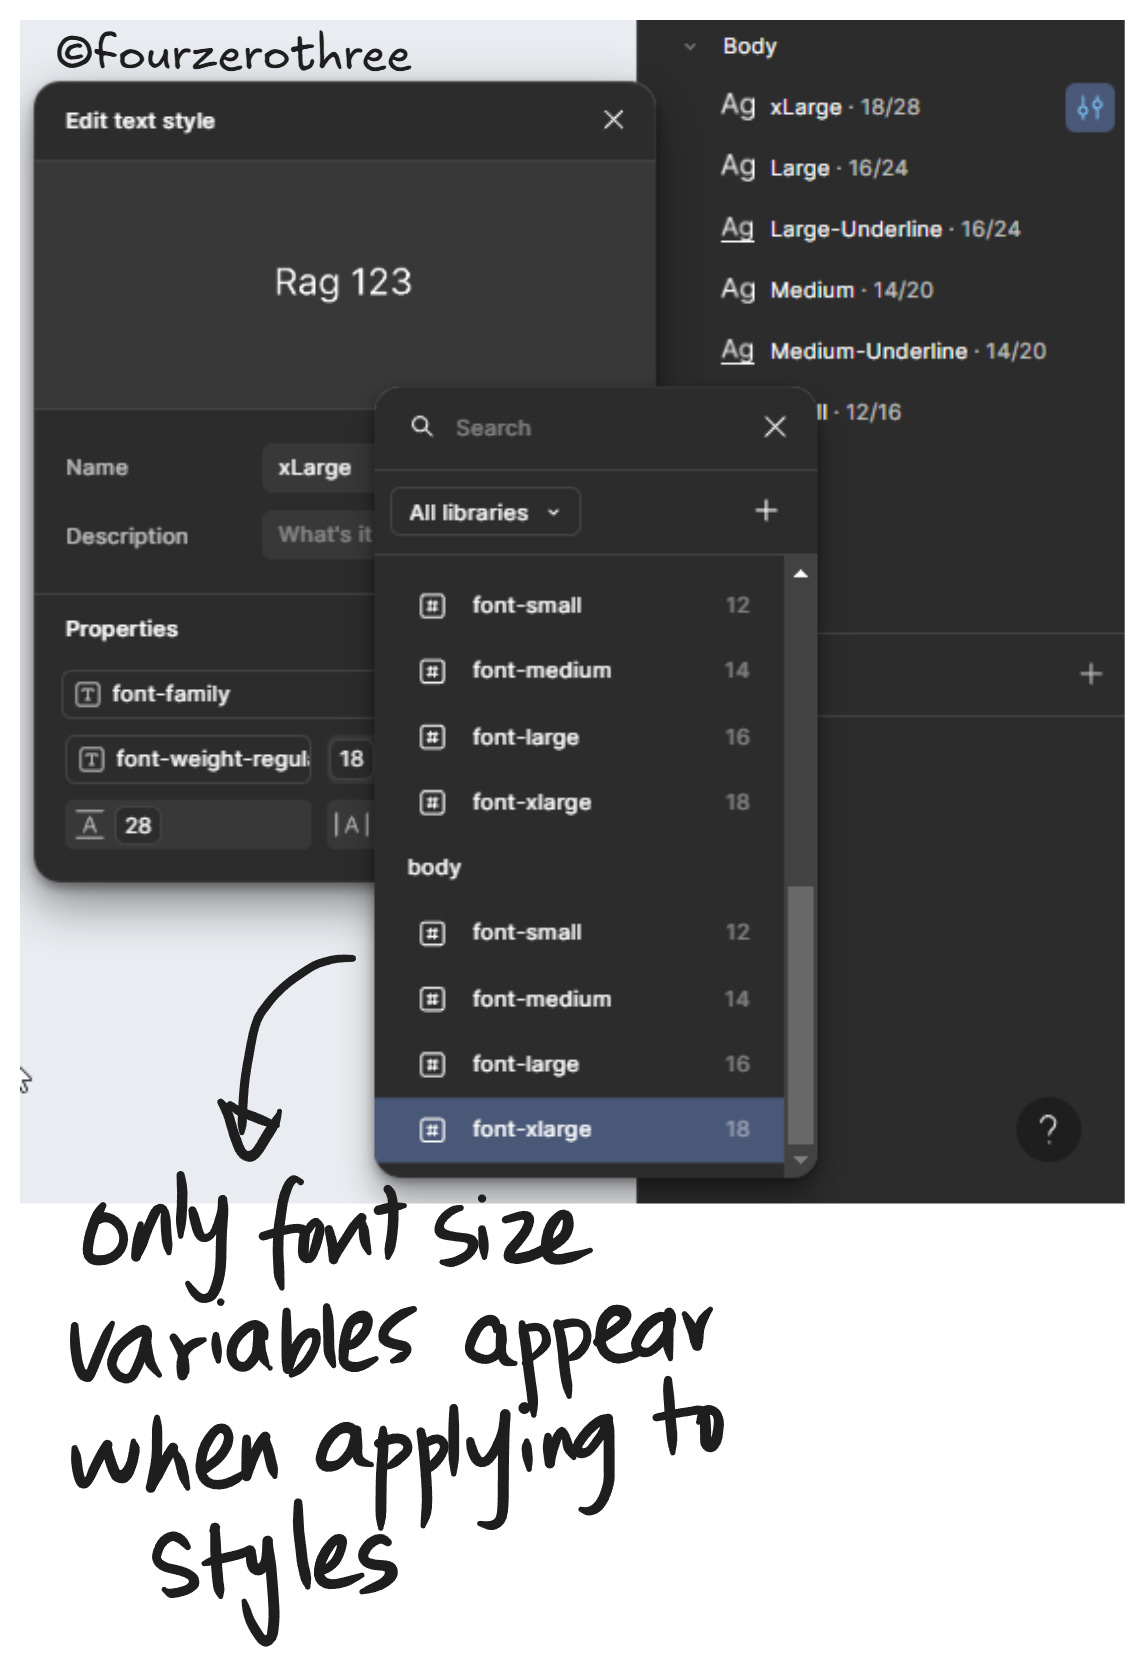
Applying variables
Applying them is quite straightforward. Every property in the style would have a “Apply variable” option, clicking which would help you apply the variable.

Key Takeaways:
Use typography variables to centralize font properties - no more manual style updates.
Leverage modes to switch between font families or other brand styles (font weight, size etc.).
Set up both primitive and semantic variables - this keeps your system flexible and structured.
Keep an eye out for font weight naming inconsistencies across typefaces.